

Open any design forum or LinkedIn post from a computational designer this year, and you will see the same two names: Grasshopper and ComfyUI. Most content about this combination stops at the headline — it tells you these tools are powerful together without ever showing how the pipeline actually works. This includes what you click, what you export, which nodes you connect and in what order, and so on…
That is what this blog is. Not a career pitch. Not a trends roundup. A real walkthrough of how a Grasshopper model becomes an AI-generated architectural visualisation, and what you need to understand to build that process from scratch.
If you are an architecture student who has heard people talk about this workflow and felt like the actual semantics were somehow being skipped over, you are right. Let's fix that.
Why Use These Two Tools Together?
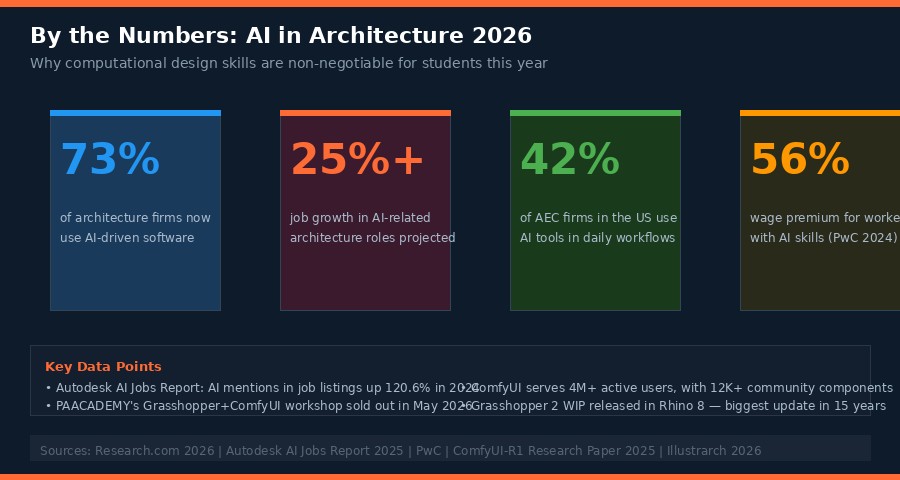
Grasshopper and ComfyUI share something important: both are node-based environments built on the logic of connecting modular components.
In Grasshopper, you wire together sliders, geometry components, and analysis tools to define a parametric form. In ComfyUI, you wire together loaders, samplers, and conditioning nodes to control how an AI generates an image. The conceptual grammar is identical. If you already think in Grasshopper, ComfyUI will feel familiar within an hour.
Beyond the interface similarity, they occupy completely different jobs in the design process. Grasshopper handles precise geometry — the spatial logic, the structural rules, the parametric relationships. ComfyUI handles visual translation — turning that geometry into a photorealistic render that preserves your spatial intent while generating material, light, and atmosphere. Neither replaces the other. They both work together like an architect’s brain and the renderer that speaks the client's visual language.
The practical payoff: instead of spending four hours in V-Ray tuning a single render, you set up a ComfyUI workflow that generates twenty material variations of the same parametric facade in the time it would take to produce a single traditional output. That is not a small efficiency gain. That is a fundamental shift in how the early stages of a project move.
Setting Up the Environment & Understanding What You Actually Need
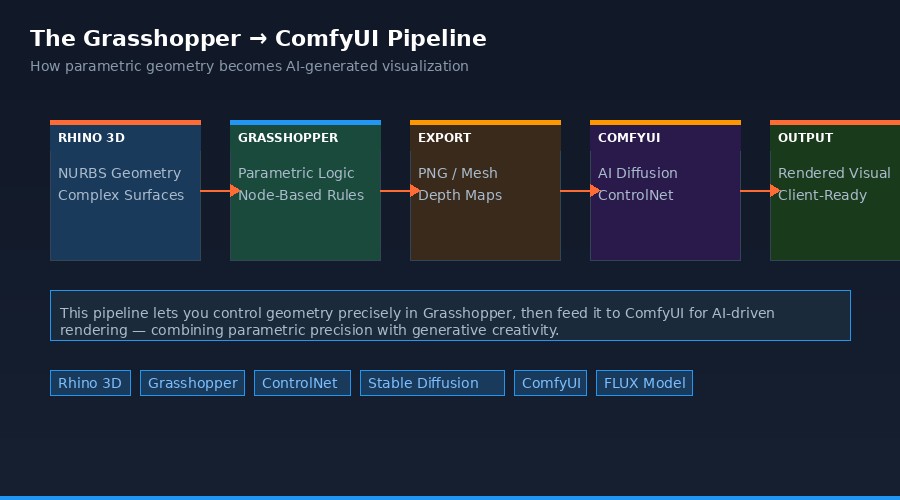
Before anything else, here is what needs to be running. Getting the setup right is where most students stall — so work through this carefully before moving to the workflow.
On the Grasshopper / Rhino side
- Rhino 7 or Rhino 8 (Rhino 8 recommended — Grasshopper 2 WIP is available via the Package Manager with faster performance and better Python scripting)
- Grasshopper-ComfyUI-Nodes plugin from Food4Rhino (free for students). Copy the GHComfyUI folder to your Grasshopper Libraries directory
- Ladybug Tools for the Capture View component, which automates viewport exports as PNG directly inside Grasshopper
- Ambrosinus-Toolkit as an alternative — includes a ViewCapture component that saves your Rhino viewport as JPG/PNG and passes it to the AI pipeline automatically
On the ComfyUI side
- ComfyUI installed locally — needs Python 3.10+, Git, and a GPU with at least 8GB VRAM. NVIDIA RTX 3060 12GB or better is the practical minimum for comfortable use
- ComfyUI Manager installed (handles all further installs from inside the interface — do not skip this)
- For your checkpoint model: an architecture-focused SD1.5 checkpoint, such as architecturerealmix_v11 for ControlNet workflows; for FLUX workflows, FLUX.1 Dev from Black Forest Labs on HuggingFace
- ControlNet depth model: control_v11f1p_sd15_depth_fp16.safetensors for SD1.5; Flux ControlNet Union Pro model for FLUX workflows
- ComfyUI ControlNet Auxiliary Preprocessors via Manager — gives you the Zoe-DepthMapPreprocessor node, currently the best depth map generator for architectural scenes
No GPU?
Run ComfyUI entirely in a browser via Runninghub.ai — cloud GPUs, prebuilt architecture workflows, no local install. Costs are modest for student-level usage.
The Core Workflow: Grasshopper to ComfyUI in Five Stages
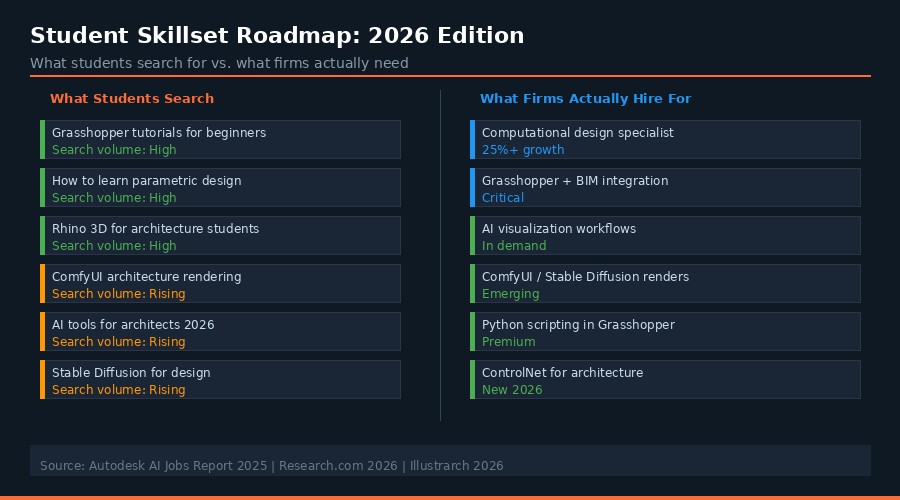
Walk through this once with a simple model — a panelised facade, a pavilion roof — before trying it on something complex. The pipeline is not difficult once you have run it end-to-end at least once.
Stage 1 — Build and Frame Your Model in Grasshopper
Design your parametric model as normal. The only additional thing you need to think about at this stage is the camera.
- Set up a Rhino Named View from the angle you want to render
- Right-click in the viewport, go to Set View > Named Views, and save it.
- You will reference this name string in the export component.
If your model has dense geometry, hide anything outside the frame. The viewport capture is essentially a screenshot. Cleaner geometry gives the depth preprocessor cleaner spatial data, which produces better ControlNet conditioning.
Stage 2 — Export the Viewport as Your Control Image
This is the bridge step. You have two practical options:
- Grasshopper-ComfyUI-Nodes plugin: place the Load Image component on your canvas, point it to the output path, connect the Named View name string, and flip the boolean toggle to true. It captures and saves the viewport.
- Ambrosinus-Toolkit ViewCapture: connect it to your Named View name, set your output directory, and flip the toggle. The viewport saves as a file ready to pipe into ComfyUI.
Export as PNG at 512×512 or 768×768 for SD1.5/SDXL workflows. Use 1024×1024 for FLUX. Export from a clean grey-shaded viewport with visible edges — Rhino's Ghosted or Technical display mode. Do not use Rendered mode or coloured materials.
| What you are actually exporting? | The goal is not a beautiful image. It is a spatial reference. The AI does not need it to look good — it needs to read depth and edge structure clearly. A clean, shaded viewport with visible edges consistently outperforms coloured previews as a ControlNet input. |
Stage 3 — Build the ComfyUI Node Graph
Open ComfyUI at http://127.0.0.1:8188. Here is the exact node chain for the depth ControlNet workflow. Build this from scratch the first time rather than loading a prebuilt workflow — understanding what each node does is the actual skill.
- Load Checkpoint — select your architecture checkpoint (architecturerealmix_v11.safetensors or similar). Outputs MODEL, CLIP, and VAE.
- CLIP Text Encode ×2 — one for your positive prompt, one for your negative. Both connect to the CLIP output from the checkpoint.
- Load Image — load your exported Rhino viewport PNG.
- Zoe-DepthMapPreprocessor — connect Load Image output here. This node reads the spatial depth from your viewport and generates a greyscale depth map. Set resolution to match your output size.
- Load ControlNet Model — load control_v11f1p_sd15_depth_fp16.safetensors.
- Apply ControlNet — connect: positive conditioning from your positive CLIP text, ControlNet model output, and depth map image. Set strength to 0.7–0.9. This is where your Grasshopper geometry gets baked into the generation. Higher strength = more spatially faithful; lower = more AI creative freedom.
- Empty Latent Image — set to 512×512 or 768×512 depending on your composition.
- KSampler — connect MODEL, positive conditioning (from Apply ControlNet output), negative conditioning (direct from negative CLIP), and Latent Image. Steps: 20–30. CFG: 7–8. Sampler: DPM++ 2M Karras.
- VAE Decode — connect to KSampler Latent output.
- Save Image — you are done.
| If using FLUX instead of SD1.5... | Use DualCLIPLoader instead of the standard CLIP. Swap the checkpoint for your FLUX UNET. Set CFG to 1.0 — critical, FLUX uses guidance distillation and standard CFG values (7+) will burn the image. Sampler: Euler. Steps: 20–25 for Dev, 4 for Schnell. FLUX produces sharper material detail but requires 12GB+ VRAM. |
Stage 4 — Prompt Engineering for Architectural Results
Your prompt is doing two jobs simultaneously: describing what you want and preventing what you do not. Both halves matter equally in architectural work.
| Positive prompt example | photorealistic architectural photography, modern concrete and glass facade, parametric perforated panel system, golden hour lighting at 30-degree angle, warm 3000K natural sunlight, sharp foreground detail, atmospheric depth, professional architectural journal quality, ultra detailed surface texture, 8k, award-winning architecture |
| Negative prompt example | cartoon, illustration, painting, watercolour, blurry, deformed geometry, incorrect scale, oversized windows, floating elements, unrealistic proportions, low quality, noise, artefacts, bad lighting, distorted perspective |
Rules that consistently improve output:
- Lead with "photorealistic architectural photography" — this single phrase anchors the model to professional reference imagery rather than illustration styles
- Name your material specifically: "raw concrete," "perforated corten steel," "double-glazed glass curtain wall" — vague terms like "modern materials" produce generic output
- Anchor scale explicitly if needed: "human scale reference, standard door height" prevents proportion drift on building typologies
- Specify lighting technically: "golden hour at 30-degree angle, 3000K warm natural sunlight" consistently outperforms "nice lighting"
- Your negative prompt should name the specific errors you have seen in test runs — if walls float, add "floating elements"; if geometry warps, add "deformed geometry"
Stage 5 — Iterate, Refine, Document
Generate five to ten variations by changing only the seed in KSampler. The depth map holds your spatial structure constant while the AI explores material and atmospheric variations. Pick the best two or three, then use Inpainting to fix specific elements — sky, context, foreground — without regenerating the whole image.
Then document the workflow. Screenshot your ComfyUI node graph. Save it alongside the output images. The ability to show your process — not just the result — is what separates a student who understands the pipeline from one who got lucky with a prompt. That distinction matters enormously in a portfolio or an interview.
FLUX vs. SDXL: Which Model For Which Situation
In 2026, this is the most actively debated question in architectural visualisation communities. The honest answer is: both, for different stages.
SDXL with an architecture-focused checkpoint gives you:
- Faster generation — roughly 2× quicker than FLUX on the same hardware
- A large ecosystem of fine-tuned checkpoints trained specifically on building typologies, available on Civitai and HuggingFace
- Mature ControlNet support — depth, canny, and MLSD (excellent for straight-line architectural geometry) all work reliably
- The better choice if your VRAM is 8GB
FLUX.1 Dev gives you:
- Visibly sharper detail on materials — glass reflections, concrete texture, metal panel systems look more physically plausible
- Better prompt adherence for complex spatial descriptions and specific architectural vocabulary
- More coherent lighting — less of the flat or inconsistent illumination that can appear in SDXL outputs
- 12B parameters vs. SDXL's 3.5B — needs 12GB+ VRAM, generates more slowly
The Civitai community's PH's Archviz x AI workflow (updated to ComfyUI 0.4.12, February 2026) runs a staged approach that many architectural visualisers now use: SD1.5 for the initial composition pass, FLUX for the detailing pass, FLUX again for the upscale. This has been tested at up to 12288×8192px. It is the most practical multi-model approach for students who want the best of both without choosing.
For a student starting out: learn on SDXL using a depth ControlNet workflow. Once you understand what each node does, add FLUX for final outputs. Starting on FLUX is fine, but the slower generation times make the learning loop more frustrating when you are still figuring out the basics.
What These Changes Mean in a Real Design Process
The genuine value here is not the final render quality, impressive as it can be. It is the speed of the design exploration loop.
Traditional process: model in Grasshopper → export to Rhino → set up lighting → render in V-Ray for 20–40 minutes → realise the facade material does not read well → start over. Each iteration is expensive in time, so you run fewer of them and make bigger decisions with less visual evidence.
This process: model in Grasshopper → toggle export → ComfyUI generates ten material variations in five minutes, each one spatially locked to your parametric geometry. You see what raw concrete reads like versus corten steel versus a glazed curtain wall, all before lunch. You have something to show a tutor that afternoon rather than next week.
RIBA Journal noted in March 2026 that firms like Thornton Tomasetti are building pipelines that "combine numerical evaluation with design visualisation" — the same loop described here, at enterprise scale. The student who learns this workflow now will have genuine fluency with it by the time they sit across the table from those firms in an interview.
A Student’s Ready-to-follow Roadmap
Realistic timeline assuming 8–10 hours of focused practice per week alongside college work.
Months 1–2: Grasshopper Foundations
- Master component logic first: data trees, lists, branches — these will trip you up on every project if you skip them
- Build three projects: a panelised facade, a twisted tower section, and a sun-responsive shading system. Each forces you to think parametrically rather than manually
- Resources: Sign up for Grasshopper Masterclass/Full-time courses. Both are structured for architecture students and cover the exact skillset you need here
Months 3–4: ComfyUI Foundations + First Integration
- Install ComfyUI and build the basic text-to-image workflow manually from a blank canvas. Do not start with a premade workflow — building from scratch is how you learn what each node does
- Move to image-to-image: load a hand sketch or a Rhino viewport, use img2img to explore material variations. The denoise strength slider is your key control — start at 0.6 and adjust
- Install Grasshopper-ComfyUI-Nodes and run your first Grasshopper viewport through the depth ControlNet workflow using the steps in this article
Months 5–6: A Real Project Workflow
- Pick one actual project — a thesis, competition entry, or self-initiated work — and run the full pipeline on it end-to-end
- Document every step as you work: Grasshopper definition screenshot, ComfyUI node graph screenshot, depth map, and final output. This is your portfolio entry for this skill
- Try the PH's Archviz staged workflow from the Civitai community. Understand what the FLUX detailing pass actually adds to an SDXL base, and whether your hardware supports it
From Month 6 Onwards: Python + Automation
- ThinkParametric's 2026 course covers Python AI rendering inside Grasshopper using the Gemini API and FLUX Kontext — the advanced step that takes this workflow from manual to semi-automated
- With Python in Grasshopper 2, you can script the full loop: adjust a slider, capture viewport, queue ComfyUI generation, retrieve output — without leaving Grasshopper. That is the production-ready version of this workflow
To Sum It Up
This workflow has a learning curve. The first time you correctly set up a depth ControlNet pipeline and watch a Grasshopper facade become a photorealistic render in under a minute, it feels like something has genuinely shifted. That feeling is accurate.
But it takes time to understand why the depth map matters, what CFG actually controls, why FLUX needs a fundamentally different approach to prompting than SDXL, and why your spatial geometry sometimes comes through perfectly and sometimes drifts. The students who build real fluency here are the ones who work through those confusions rather than switching back to Midjourney when it gets complicated.
At Kaarwan, we work specifically on closing the gap between what architecture education teaches and what the profession actually needs. If you want structured guidance to build this workflow from the ground up — rather than piecing it together from scattered YouTube tutorials — our computational design programs are built exactly for that.
FAQs
Q1. Do I need a powerful GPU?
No. You can use cloud GPUs via Runninghub.ai. For local setups, an RTX 3060 12GB is the practical minimum.
Q2. What Rhino export settings work best?
Export PNGs in Ghosted or Technical mode. Use 512–768px for SDXL and 1024px for FLUX.
Q3. What does ControlNet strength do?
It controls how closely the output follows your depth map. Start around 0.8.
Q4. Why does FLUX use CFG 1.0?
Higher CFG values break FLUX outputs. Keep it at 1.0.
Q5. What’s the most common mistake?
Using rendered or textured viewport images instead of clean grey-shaded ones.
Q6. Does this work for interiors?
Yes. Depth conditioning works especially well for interior layouts and proportions.
Q7. How do I edit one part of an image?
Use Inpainting with a mask and a new prompt.
Q8. Can I animate Grasshopper variations?
Yes. Use the same seed across frames for consistent lighting and materials.
Q9. What should I show in my portfolio?
Include the full workflow: Grasshopper, depth map, ComfyUI graph, and final render.
Q10. How does this compare to Enscape or V-Ray?
ComfyUI is faster for concept exploration; Enscape and V-Ray are better for final technical renders.




.png)