So you've got your SketchUp model looking decent. Walls are up, the roof's on, maybe you've even added some furniture blocks from the 3D Warehouse. And then you export it and... it looks like a video game from 2009. Flat. Lifeless. Nothing like the moody, sunlit renders you keep seeing on Pinterest and in your seniors' portfolios.
That gap between "SketchUp model" and "photorealistic render" is exactly what V-Ray for SketchUp closes. It's been the industry's go-to rendering plugin for over a decade now, and honestly, most architecture firms in India still build their visualization workflow around it - even with newer real-time engines crowding the space. If you're a design student trying to build a render-ready portfolio, or a working professional who keeps hearing "just V-Ray it" in client meetings, this guide walks you through everything from installing the plugin to fixing that one render that keeps coming out pitch black (we've all been there).
Let's get into it.
Also Read : Introduction to V-Ray Rendering for Interior and Architecture
What Is V-Ray and Why Do Architecture Firms Still Use It?
V-Ray is a rendering engine built by Chaos, and it plugs directly into SketchUp - no separate software to juggle, no exporting your model somewhere else and hoping the geometry doesn't break. You model in SketchUp like you always do, then hit render, and V-Ray simulates how light actually behaves: bouncing off walls, scattering through glass, softening as it wraps around furniture.
What keeps it relevant, even with faster real-time tools now available, is control. V-Ray gives you granular say over every material property, every light source, every camera setting - the kind of precision that matters when a client is paying for a render that has to look exactly right, not just good enough. It's also just deeply embedded in how the industry works. Job listings for junior architects and interior designers in India routinely list V-Ray as a required skill, right alongside SketchUp itself. Learning one without the other feels incomplete at this point.
Want to move from watching tutorials to actually producing production-ready renders your portfolio can stand on? Kaarwan's V-Ray Rendering masterclass walks you through real project workflows, not just isolated software features, so you leave with renders you'd actually show a client.
Installing V-Ray for SketchUp: Requirements and Setup
Before you download anything, a quick reality check on whether your laptop can handle it.
What you'll need:
- A 64-bit version of Windows 10 or 11
- A processor with AVX2 support (most machines from the last 5-6 years have this)
- At least 8 GB RAM, though 16 GB makes a real difference once your scenes get bigger
- An NVIDIA GPU with the latest drivers if you want to use GPU rendering - not mandatory, but it speeds things up a lot
Once you've confirmed your system checks out, head to Chaos's official site and grab the installer. It's a standard .exe file - download it, run it, accept the license agreement, and let it install. You'll be asked to sign in with a Trimble account (the same one tied to your SketchUp license) to activate the plugin. If you're a student, don't skip this: Chaos offers a free educational license through their education portal, fully featured, no watermarks. There's also a 30-day free trial if you just want to test the waters first.
Once it's in, open SketchUp and you should see two new toolbars sitting there - the V-Ray toolbar and the V-Ray Lights toolbar. That's your sign the install went through.
Also Read : From 2D to 3D: Elevate Your Designs With Realistic Renders in V-Ray
Getting Familiar With the V-Ray Interface (Asset Editor, Frame Buffer)
Here's where a lot of beginners freeze up a little. The interface looks dense at first, but it really boils down to two things you'll use constantly.
The Asset Editor is your control center. It has five tabs - Materials, Lights, Geometry, Render, and Settings - and you'll spend most of your time flipping between Materials and Render. Think of it as the one place everything lives, so you're not hunting through five different menus every time you want to change a texture or bump up your render quality.
The Frame Buffer is the window that actually shows your render as it's processing. It updates in real time, which is genuinely one of the more satisfying parts of using V-Ray - you get to watch the image sharpen and settle rather than staring at a progress bar and hoping.
A quick tip that'll save you a lot of frustration early on: use Interactive Rendering before committing to a final render. It's basically a live preview mode - you tweak a light or swap a material and see the change happen almost instantly, instead of rendering, waiting, realizing something's off, and starting over. Keep the resolution low while you're testing (something like 800x600 is plenty), then switch to your full quality settings only once the composition and lighting actually feel right.
Also Read : Top 10 Tools Every Architect Should Know for Advanced 3D Rendering
Applying Materials With Chaos Cosmos
Materials are where a render either starts looking real or starts looking like plastic - and there's no in-between, unfortunately.
V-Ray gives you a Generic Material type with three properties that do most of the heavy lifting: Diffuse (the base colour or texture), Reflection (how shiny or matte the surface reads), and Roughness (how sharp or blurred those reflections appear). A polished marble floor and a rough concrete wall are, at their core, just different combinations of these three sliders.
This is also where Chaos Cosmos becomes genuinely useful. It's a built-in library of ready-made, render-optimized assets - furniture, vegetation, HDRI skies, people - that you can drag straight into your scene without building or texturing anything from scratch. For students working under tight deadlines, this alone saves hours. Instead of spending an evening hand-modelling a sofa that'll sit in the background of one shot, you pull something from Cosmos, drop it in, and move on to the parts of the render that actually need your attention.
A mistake worth flagging early: material scale. A 600mm floor tile rendered at the wrong scale instantly reads as fake, no matter how good your lighting is. Always double-check your texture sizing against real-world dimensions before you hit render - it's a two-minute fix that saves you from redoing an entire pass later. If you want to see exactly how this plays out on a real project, see this workflow applied to a real interior project, where material and lighting decisions are walked through step by step on an actual bedroom render.
Lighting Your Scene: Sunlight, Domelight, and Artificial Lights
If materials are what make a render believable, lighting is what makes it feel like something. This is genuinely the part where V-Ray earns its reputation.
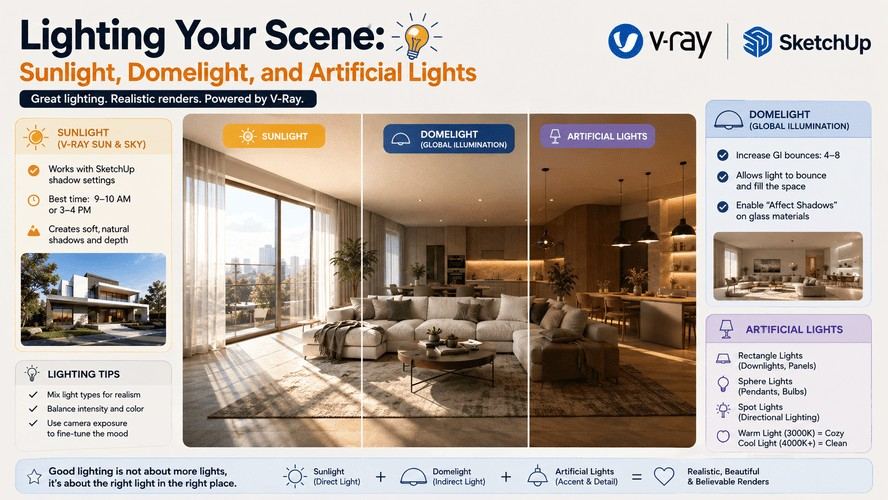
For exterior daylight scenes, V-Ray's Sun and Sky system does most of the work for you. Enable V-Ray Sun, and it reads directly off SketchUp's shadow settings - so the sun position you set in SketchUp's Shadows panel carries straight through. Early morning or late afternoon (roughly 9-10am or 3-4pm) tends to give you the most flattering, dramatic shadow angles, rather than harsh midday light that flattens everything out.
Interiors need a touch more thought. Light entering through windows behaves differently once it's bouncing around inside four walls, so you'll want to bump up your Global Illumination bounces - somewhere between 4 to 8 - so the light has room to scatter and fill the space naturally instead of leaving corners looking dead. Also worth remembering: your glass materials need "Affect Shadows" enabled, or you'll end up with windows that cast solid black shadows like they're made of concrete, not glass.
For night scenes or artificially lit interiors, you're working with Rectangle Lights (great for downlights and panel lighting), Sphere Lights (for pendant fixtures and bulbs), and Spot Lights for anything directional. A warm colour temperature around 3000K generally reads as cosy and residential, while cooler temperatures suit more clinical or commercial spaces. For a deeper look at moving from flat, static plans into fully rendered, atmospheric output, for a broader look at moving from flat plans to photorealistic output is worth a read alongside this section.
Also Read : How to Render a Bedroom Using SketchUp and V-Ray
Camera Settings: Exposure, White Balance, Depth of Field
This is the part beginners tend to skip, and honestly, it's where a lot of "why does my render look off" problems actually live.
Exposure Value (EV) controls overall brightness, and it changes depending on what you're rendering. Interiors typically sit around EV 7-9, while exteriors need something closer to EV 12-14 to avoid blowing out in direct sunlight. If your interior render keeps coming out murky and dark, this is usually the first thing to check before you start second-guessing your lighting setup entirely.
White Balance shifts the overall colour temperature of your image - warmer or cooler - and it's worth adjusting to match the mood you're going for rather than leaving it on default every time.
Depth of Field is what gives you that slightly blurred background you see in more cinematic architectural shots, where the foreground stays sharp and everything behind it softens out. It's a nice touch for hero shots, but honestly, use it sparingly. Overdoing DOF on every single render starts to look gimmicky fast, and clients tend to prefer clarity over style points, especially for construction-drawing-adjacent visuals.
Common Beginner Mistakes in V-Ray for SketchUp
A running list of the stuff that trips up almost everyone at some point - you're not doing anything wrong, this is just part of the learning curve.
- Black render, no visible geometry: Usually means there's no light in the scene, or your camera's accidentally sitting inside a closed volume. Check both before panicking.
- Grainy, noisy final image: Your quality preset is probably set too low. Bump it up, or raise the noise threshold in your render settings.
- Opaque, black-looking glass: Almost always "Affect Shadows" not being enabled on the glass material. An easy fix once you know to look for it.
- Render taking forever: High resolution combined with too many lights and complex materials. Drop the resolution while testing, and save the full-quality pass for your actual final output.
- Materials looking like plastic instead of real surfaces: Reflection and roughness values are usually the culprits. Matte surfaces need higher roughness; shiny ones need less reflection blur.
For a broader set of fixes that apply beyond just V-Ray settings - composition, lighting logic, general render polish - general render-quality fixes that apply beyond V-Ray specifically rounds out this section nicely if you want to keep improving past the basics.
Ready to turn your SketchUp models into stunning renders? Join Kaarwan’s V-Ray Masterclass and learn lighting, materials, rendering, and professional visualization techniques.
V-Ray vs Real-Time Renderers: When to Use Which
This is probably the question actually sitting in the back of your mind right now, so let's address it directly.
Real-time engines have gotten genuinely good - faster feedback loops, easier onboarding, near-instant previews as you tweak a scene. For quick design reviews, client walkthroughs, or situations where speed matters more than absolute precision, they've become a legitimate part of many studios' workflows.
V-Ray, on the other hand, still wins when the render is the deliverable - competition boards, final client presentations, portfolio hero shots, anything where every material, shadow, and reflection needs to hold up under close inspection. It takes longer, no question. But that extra render time buys you a level of physical accuracy that's genuinely hard to match.
Most working professionals don't pick one over the other permanently - they use both, depending on the stage of the project. Real-time for internal reviews and fast iteration, V-Ray for the images that actually leave the studio.
FAQs
Is V-Ray for SketchUp free to try?
Yes. Chaos offers a fully-featured 30-day free trial, and if you're a student, their educational license is free indefinitely once you verify your enrolment.
How long does a V-Ray render take compared to real-time engines?
It varies a lot depending on scene complexity and your hardware, but as a rough guide, a high-quality V-Ray interior render can take anywhere from 10 to 30 minutes, versus near-instant previews in a real-time engine. The trade-off is accuracy - V-Ray's extra time generally shows in the final image quality.
Do I need a powerful GPU for V-Ray?
Not strictly. V-Ray's CPU engine handles everything and is what most final renders use. A decent NVIDIA GPU (6GB VRAM or more) speeds up interactive previews significantly, but it's a nice-to-have rather than a hard requirement, especially for students just starting out.
Can I use V-Ray materials in other renderers?
Not directly - V-Ray materials (.vrmat files) are built for V-Ray's engine specifically and won't carry over cleanly to other rendering plugins. If you're switching tools between projects, you'll generally need to rebuild materials from scratch or use universal texture formats like PBR sets as a starting point instead.