
A filler slab is a reinforced concrete slab where the structurally redundant concrete in the lower tension zone is replaced by lightweight filler materials such as clay pots, terracotta tiles, waste glass bottles, or coconut shells. This reduces the dead load of the slab, cuts material costs by 15–30%, improves thermal insulation, and creates a distinctive exposed ceiling aesthetic — all without compromising structural strength.
In a conventional RCC slab, the tension zone below the neutral axis carries no compressive load — concrete placed here adds weight and cost without contributing structurally. Filler slab construction, popularised in India by architect Laurie Baker, whose cost-conscious, environmentally sensitive approach to architecture transformed building practice across Kerala. The reinforcement grid and upper compression layer remain fully intact, maintaining complete structural performance

Image credits: Shivani Chougula @Kaarwan
Working & Components of a Filler Slab:
A filler slab follows the same basic structural principles as a conventional RCC slab but optimizes material usage. It is constructed by placing filler units between the bottom reinforcement bars within the slab formwork, ensuring these units do not interfere with the concrete cover or reinforcement spacing. The key components include:
- Compression Zone: The upper part of the slab that resists compressive forces, cast in solid concrete.
- Tension Zone: The lower part where tensile reinforcement is placed; here, concrete is replaced with lightweight filler material.
- Reinforcement Bars: Steel rods placed in both directions to resist tensile stresses.
- Filler Materials: Hollow or lightweight objects such as clay pots, tiles, bottles, or shells that displace concrete without affecting load-bearing capacity.
- Formwork: Supports and shapes the slab during casting, ensuring correct placement of fillers and steel.
When the slab is loaded, the upper concrete layer handles compression, while the steel reinforcement resists tension. Since concrete in the tension zone is structurally redundant, replacing it with lightweight materials reduces dead load, cost, and environmental impact.
Filler Slab Construction Process
A filler slab is built following a specific sequence to ensure correct placement of filler materials without compromising reinforcement cover or structural integrity.
Step 1 — Formwork preparation: Set up the slab formwork at the required level. Ensure the shuttering is clean, level, and properly supported to carry the full wet concrete load.
Step 2 — Bottom reinforcement placement: Lay the first layer of steel reinforcement bars in both directions as per the structural drawing. Place cover blocks to maintain the correct concrete cover from the bottom.
Step 3 — Filler unit placement: Place the selected filler units — clay pots, terracotta tiles, glass bottles, or coconut shells — between the reinforcement bars in the tension zone. Filler units must not touch the reinforcement bars. Maintain the required concrete cover on all sides of each unit.
Step 4 — Top reinforcement placement: Lay the second layer of reinforcement bars over the filler units to complete the two-way reinforcement grid.
Step 5 — Concrete pouring: Pour concrete carefully to fill all gaps between and around filler units. Use a vibrator to ensure full compaction without displacing the filler units from their position.
Step 6 — Curing: Cure the slab for a minimum of 14 days. Keep the surface continuously moist throughout the curing period to achieve full design strength.
Step 7 — Formwork removal and finishing: Remove formwork after adequate curing. The underside may be left exposed to reveal the filler pattern as a design feature, or plastered smooth depending on the design intent.
Types of Filler Slabs:
1. Clay Pots
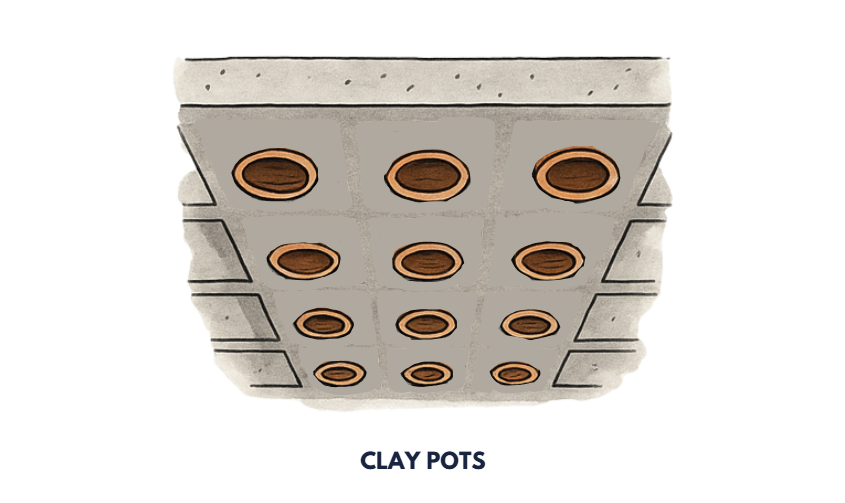
Image credits: Shivani Chougula @Kaarwan
Clay pots are one of the most widely used filler materials due to their availability, light weight, and excellent thermal insulation. Their curved form helps distribute loads evenly and allows for efficient placement between steel reinforcements. This method is popular in southern India, particularly in Kerala and Karnataka, where terracotta craftsmanship is prevalent. The same regional craft tradition that informs filler slab construction is also central to Kerala's traditional architecture, where terracotta and locally fired clay define both structural and decorative elements. The porous nature of clay reduces heat transfer, keeping interiors cooler in hot climates. Exposed from below, clay pots also add a rhythmic, rustic aesthetic to ceilings. Best suited for residential and institutional buildings aiming for traditional charm with modern structural efficiency.
2. Terracotta Tiles
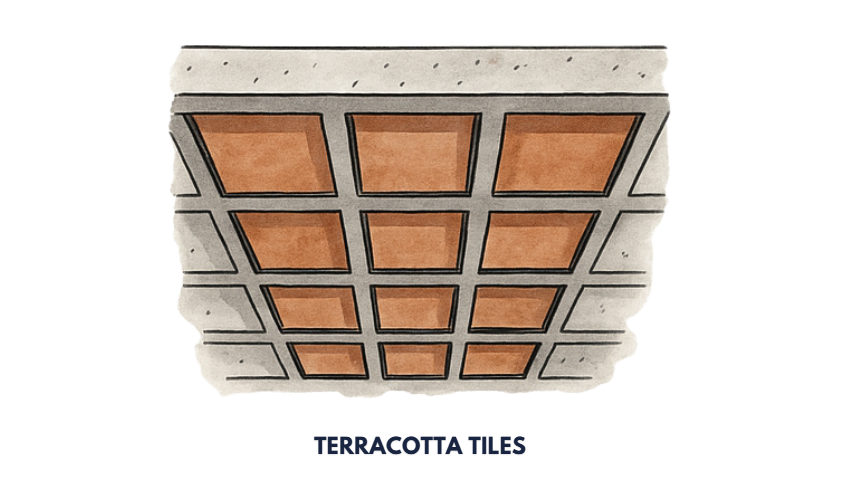
Image credits: Shivani Chougula @Kaarwan
Flat clay or terracotta tiles work well in filler slabs where a more uniform, planar underside is desired. Terracotta tiles are durable, moisture-resistant when properly treated, and maintain a warm earthy tone that complements exposed ceilings. They are common in Goa, Tamil Nadu, and parts of Maharashtra, often chosen for heritage-sensitive projects or eco-conscious resorts. The tile form enables easy alignment with the slab’s grid and can be combined with decorative patterns for a refined finish. Their compact size also makes handling and placement faster, reducing construction time.
3. Waste Glass Bottles
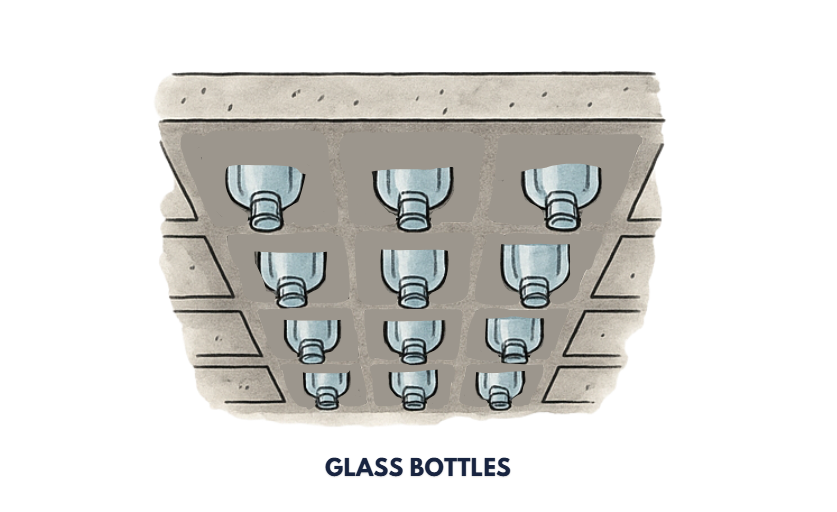
Image credits: Shivani Chougula @Kaarwan
Repurposing waste glass bottles in filler slabs is a creative, eco-friendly solution that diverts material from landfills while enhancing daylighting potential. Transparent or colored bottles can be positioned so that their ends face downward into interior spaces, creating unique light patterns when sunlight filters through. This method is popular in experimental eco-architecture and educational institutions to demonstrate sustainable design practices. Care must be taken to position bottles without compromising reinforcement cover and to ensure proper sealing to prevent moisture ingress. The aesthetic is playful and contemporary, making it ideal for artistic projects and public spaces.
4. Coconut Shells
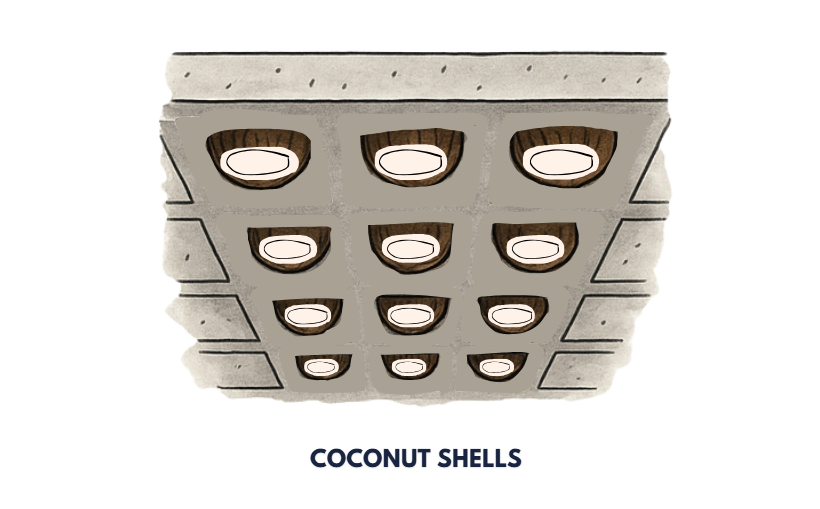
Image credits: Shivani Chougula @Kaarwan
Coconut shells, readily available in coastal regions, offer an organic, textural finish when used in filler slabs. Naturally lightweight yet rigid, they reduce concrete volume while adding a distinct tropical design element to interiors. In states like Kerala and coastal Karnataka, coconut shells are a cost-free byproduct of local agriculture, making them an accessible and sustainable choice. When polished and left exposed, the underside provides a patterned ceiling with a warm, earthy tone. Coconut shells are particularly suited for rural community buildings, farmhouses, and cultural pavilions.
Filler Slab Roof Applications
Filler slabs are widely used as roof slabs in residential and institutional buildings, particularly in southern India where traditional filler materials are locally available and the climate benefits from the thermal insulation properties of clay and terracotta.
When used as a roof slab, filler slab construction offers two specific advantages beyond a standard floor slab application. First, the air pockets created by filler units provide a natural thermal buffer between the hot roof surface and the interior ceiling, reducing heat gain significantly compared to a solid RCC roof. Second, the exposed underside of the filler units creates a decorative ceiling in the room below without any additional finishing material.
Key consideration for filler slab roofs: waterproofing is critical. Porous filler materials like clay pots and coconut shells must be protected with a continuous waterproofing layer on the top surface of the roof slab. Without proper waterproofing treatment, moisture will penetrate through the porous fillers and cause damp patches on the exposed ceiling below. A standard waterproofing screed or membrane applied over the structural slab layer before the final roof finish resolves this completely. For architects designing thermally efficient roofs, understanding passive cooling techniques in Indian architecture alongside filler slab principles helps create roofs that perform well both structurally and climatically.
Filler Slab Advantages and Disadvantages
Advantages
Reduced material cost: Replacing non-structural concrete with locally available filler materials reduces overall concrete volume by 15–30%, directly cutting material and labour costs. Savings are most significant on large residential or institutional floor plates.
Lower dead load: A lighter slab reduces the load transferred to beams, columns, and foundations — enabling more economical structural design across the entire building, not just the slab.
Better thermal performance: Air pockets within filler units act as natural insulation, reducing heat transfer through the slab. This is particularly valuable in hot climate regions where roof and floor thermal performance directly impacts interior comfort and cooling loads.
Aesthetic ceiling character: When left unplastered, filler slab ceilings create a distinctive patterned surface with visual warmth and texture that conventional RCC slabs cannot achieve. This is increasingly used as a deliberate design feature in eco-conscious and heritage-sensitive projects.
Lower environmental impact: Reduced cement consumption, use of locally available or waste materials, and lower dead load all contribute to a reduced carbon footprint compared to conventional RCC construction.
Disadvantages
Requires skilled and experienced labour: Correct filler unit placement demands masons who understand reinforcement cover requirements precisely. Improper placement — filler units touching reinforcement or inadequate cover — directly compromises structural integrity.
Not suitable for all spans: Most effective for shorter spans between 3–6 metres. For longer spans, a structural engineer must review the slab design before adopting filler slab technology since the structural assumptions change significantly.
Waterproofing complexity in roof applications: Porous filler materials require a dedicated continuous waterproofing layer on the roof surface. This adds a step to the construction process that a solid RCC roof does not require.
Limited standardisation: Unlike conventional RCC slabs with established standard specifications, filler slab designs vary based on local materials, regional practice, and individual structural engineer recommendations — making quality control more dependent on careful site supervision.
From filler slabs to full-scale design — find the course that fits your career goals.
Filler Slab Thickness
Standard filler slab thickness ranges between 100mm and 150mm for typical residential spans of 3 to 5 metres.
The exact thickness depends on three factors: the span between supports, the imposed load the slab must carry, and the height of the filler units used. For clay pot filler slabs, a total slab thickness of 115mm to 150mm is typical, with the pot height determining how deep the tension zone replacement goes. For terracotta tile filler slabs, 100mm to 120mm is common for shorter spans.
The concrete compression zone above the filler units must be a minimum of 25–30mm thick to maintain structural performance. The concrete cover below and around all reinforcement bars must meet standard IS code requirements regardless of filler unit placement.
All thickness specifications must be confirmed by a structural engineer based on the specific span, design loads, and filler unit dimensions for each individual project. Do not apply generic thickness values to a project without structural engineer sign-off.
Want to apply sustainable construction techniques like filler slabs in real architectural projects? Kaarwan's BIM Certification Program for Civil Engineers covers structural coordination, sustainable design documentation, and construction detailing used in modern Indian practice.
Frequently Asked Questions
1. What is a filler slab?
A filler slab is a reinforced concrete slab where the structurally redundant concrete in the lower tension zone is replaced by lightweight filler materials such as clay pots, terracotta tiles, glass bottles, or coconut shells. This reduces dead load and construction cost by 15–30% without reducing structural strength.
2. What is the standard thickness of a filler slab?
Standard filler slab thickness ranges from 100mm to 150mm for residential spans of 3–5 metres. Exact thickness depends on span, load, and filler unit size and must be confirmed by a structural engineer for each project.
3. What materials are used in filler slab construction?
Common filler materials include clay pots, terracotta tiles, waste glass bottles, and coconut shells. Material choice depends on local availability, cost, thermal performance requirements, and the desired exposed ceiling aesthetic.
4. What are the advantages of a filler slab?
Key advantages include 15–30% reduction in material cost, lower dead load on the structural system, improved thermal insulation especially in hot climates, distinctive exposed ceiling aesthetics, and reduced environmental impact through lower cement consumption.
5. Is filler slab suitable for roof construction?
Yes. Filler slabs are widely used as roof slabs, especially in southern India. When used for roofs, a continuous waterproofing layer is essential on the top surface to prevent moisture ingress through porous filler materials like clay pots and coconut shells.
6. What is the standard filler slab pot size?
Clay pot sizes for filler slabs vary by manufacturer and regional practice but commonly range from 200mm to 300mm in diameter and 75mm to 100mm in height. The pot size determines the depth of the tension zone replacement and influences the final slab thickness specification.
7. Who invented filler slab construction in India?
Filler slab construction in India was popularised by architect Laurie Baker, a British-born architect who championed cost-effective and environmentally conscious building techniques across Kerala from the 1960s onwards.
8. Can filler slab ceilings be left exposed?
Yes — the exposed underside of filler slab construction is one of its most valued design features. Clay pots, terracotta tiles, and coconut shells create visually distinctive patterned ceilings when left unplastered. This is increasingly used as an intentional architectural finish in eco-conscious, heritage, and contemporary projects.
9. What is the difference between filler slab and conventional RCC slab?
In a conventional RCC slab, the full depth is cast in concrete. In a filler slab, the lower tension zone — which contributes no structural strength in compression — is replaced by lightweight filler materials. The result is a structurally equivalent slab that uses significantly less concrete, weighs less, costs less, and performs better thermally.
Final Thoughts:
In architecture, filler slabs exemplify how structural ingenuity and environmental responsibility can go hand in hand. By replacing non-structural concrete in the tension zone with lightweight filler materials, this method significantly reduces resource consumption, cost, and dead load without compromising strength. Whether using clay pots for traditional charm, terracotta tiles for a uniform finish, glass bottles for playful daylight effects, or coconut shells for organic texture, each material offers unique functional and aesthetic benefits. In an era where sustainable construction is more relevant than ever, filler slabs remain a timeless, regionally adaptable technique that blends engineering efficiency with design expression.