
Ask any quantity surveyor who's switched from manual takeoffs to Revit-based ones, and they'll probably laugh a little before answering. Not because it's funny, but because the "before" was rough. Scaling drawings by hand, recalculating everything after every design change, hoping nobody missed a beam. Revit doesn't just speed that up, it changes the whole relationship between your model and your numbers. The quantities live inside the model. Change a wall, the quantity updates. No re-measuring, no chasing revisions across a dozen spreadsheets.
This guide walks through how quantity takeoff actually works in Revit, step by step, the schedule types that matter, the quantities you'll extract most often, and where people usually mess it up.
Also Read : What is a BIM Engineer? Roles, Skills, Salary and Career Path 2026
Why Model-Based Takeoff Beats Manual 2D Takeoff
Here's the honest pitch, minus the sales language. Manual 2D takeoff means scaling dimensions off drawings by hand, then doing the math yourself. It's slow, and it's fragile, one small drawing revision and you're re-measuring half your schedule. Fatigue errors on large drawing sets are a real, documented problem, not a rare mistake.
Model-based takeoff flips that. Every wall, slab, duct, and door in your Revit model already carries its own dimensions, material assignments, and type data. A quantity takeoff isn't really "measuring" anymore, it's querying data that already exists. Change a floor-to-floor height, and every dependent quantity, wall area, concrete volume, whatever, updates automatically. No manual recalculation.
The accuracy jump is real too. Because Revit calculates from actual model geometry rather than approximated 2D measurements, you get true wall volumes including openings, actual floor surface areas, and exact steel member lengths with connections factored in. Multi-discipline coordination also matters here, when architectural, structural, and MEP models sit in one coordinated environment, you avoid the classic problem of double-counting an item that shows up on two different discipline drawings.
None of this means the human role disappears. Someone still needs to verify assumptions, apply waste factors, and sanity-check the output. But the raw measurement labor, the part that used to eat entire days, gets handled by the model itself.
Also Read : Essential Revit Automation Tips to Boost Productivity
Setting Up Schedules for Quantity Extraction
Before you touch a takeoff, it helps to understand what a schedule actually is in Revit terms: a live, filterable table pulling directly from your model's parameter data. Get the setup right here, and everything downstream gets easier.
You'll work with schedule fields (which parameters show up as columns), filters (narrowing results by level, phase, or type), and grouping/sorting (organizing your output so it actually reads like a usable report, not a wall of numbers).
A few habits that save real headaches later: standardize your material naming before modeling starts. If "Concrete - Cast In Place" shows up as three slightly different spellings across a model, your takeoff totals split across multiple rows instead of consolidating into one clean figure. Also worth setting up early: shared parameters for cost codes or custom tracking fields, which let you carry extra data (supplier info, phase status, whatever your team needs) straight through into your schedules.
Going deep into schedule mechanics, calculated fields, conditional formatting, template reuse across projects, is a whole topic on its own, and it's already covered properly in automating schedules with shared parameters. Worth a read if you want to build schedules that don't need rebuilding every single project.
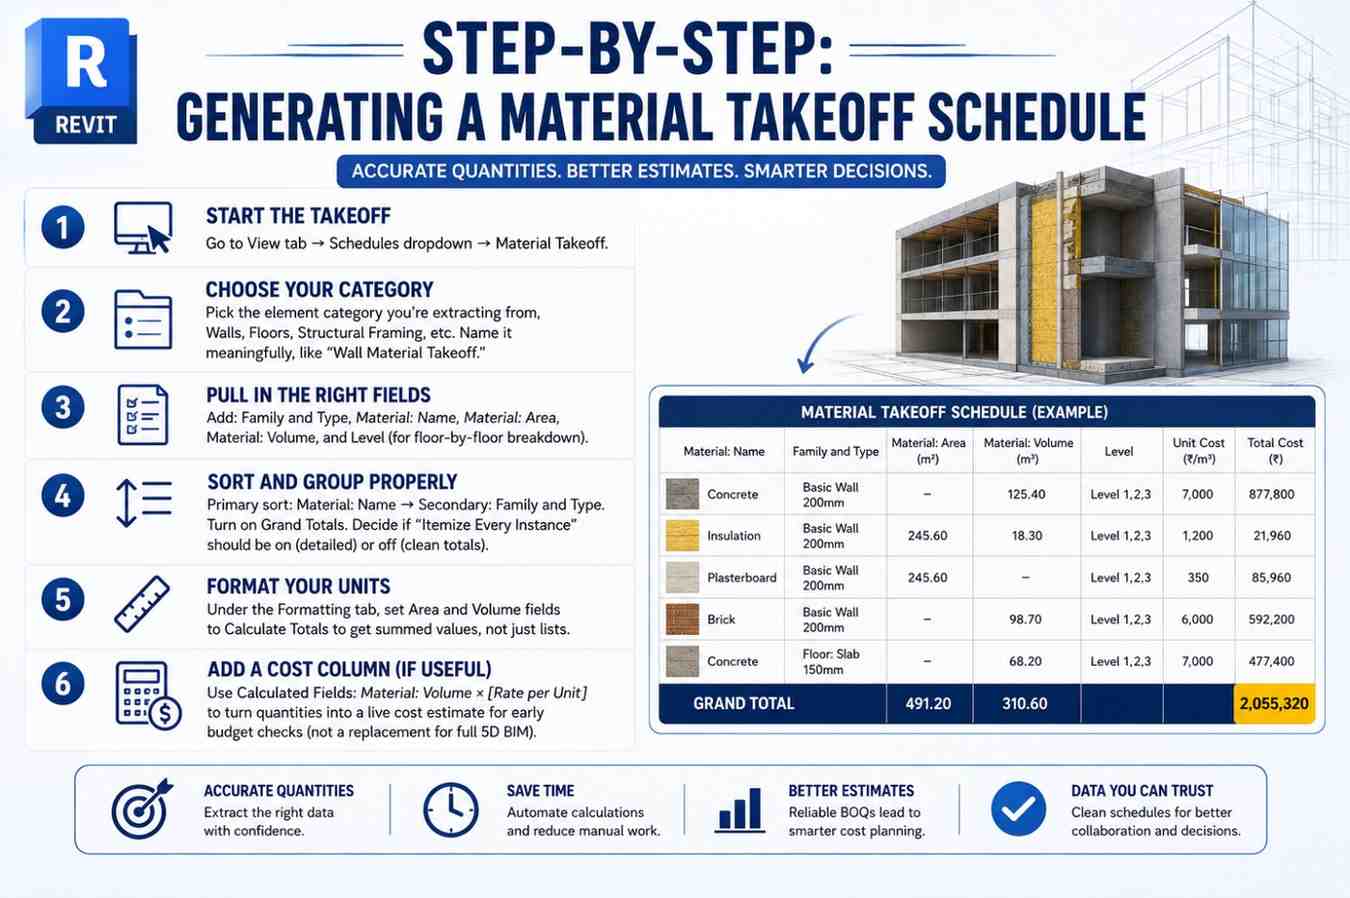
Step-by-Step: Generating a Material Takeoff Schedule
Revit actually gives you two main paths for extracting quantities, and picking the right one matters.
Schedule/Quantities is your go-to for whole-element counts and dimensions, total number of doors, linear meters of a specific wall type, that kind of thing.
Material Takeoff goes a layer deeper, breaking compound elements down into their individual material components. A wall isn't just "a wall" here, it's concrete volume, insulation area, and plasterboard area, each broken out separately. For anything estimation-related, this is usually the one you want.
Here's the walkthrough:
Step 1: Start the takeoff : Go to View tab → Schedules dropdown → Material Takeoff.
Step 2: Choose your category: Pick the element category you're extracting from, Walls, Floors, Structural Framing, whatever applies. Name it something that'll make sense six months from now, "Wall Material Takeoff," not "Schedule1."
Step 3: Pull in the right fields : From the available fields list, add: Family and Type, Material: Name, Material: Area (useful for finishes, membranes), Material: Volume (your go-to for concrete, brick, insulation), and Level if you want quantities broken down floor by floor.
Step 4: Sort and group properly: In the Sorting/Grouping tab, set your primary sort to Material: Name, secondary to Family and Type. Turn on Grand Totals. Decide whether you want "Itemize Every Instance" on or off, off usually gives you the clean consolidated totals estimators actually want.
Step 5: Format your units: Under the Formatting tab, make sure Area and Volume fields are set to Calculate Totals, otherwise you'll get a list instead of a sum.
Step 6: Add a cost column, if useful: This is where calculated fields come in, a formula like Material: Volume × [your rate per unit] turns a raw quantity schedule into a live-updating rough cost estimate. Handy for early design-stage budget checks, though it's not a substitute for full 5D BIM cost estimation, which is a much bigger topic on its own and deserves separate treatment.
Want to build schedules like this without second-guessing every field? Kaarwan's BIM Certification programs walk through exactly this kind of practical Revit workflow, not just theory.
Common Quantity Types Extracted (By Discipline)
Different disciplines lean on different quantity types, worth knowing what's typical where.
Architecture: Wall area (by type and finish), floor area, ceiling area, door and window counts by family and size, roofing surface area, room finish schedules.
Structural: Concrete volume (slabs, footings, columns, beams, broken out by grade), reinforcement steel weight (calculated from bar count, diameter, and length), structural steel tonnage by member type, formwork area.
MEP: Duct length and surface area, pipe length by diameter and material, cable tray length, equipment counts (AHUs, pumps, fixtures), insulation area on ductwork and piping. If you're producing coordination drawings alongside your quantity work, it's worth understanding MEP quantity extraction for coordination drawings since the two workflows often overlap on live projects.
Also Read: MEP Drawings in Construction: Types, Purpose and How They Work (2026)
Civil: Earthwork volumes, pavement area, drainage pipe lengths, utility runs.
The common thread across all of these: get your material assignments and modeling discipline right before you start scheduling. A schedule is only as accurate as the model feeding it. Garbage geometry in, garbage quantities out, no formula fixes that.
From Takeoff to BOQ — Exporting and Formatting for Estimators
A Revit schedule, on its own, isn't a Bill of Quantities. It's the raw material for one. Getting from schedule to something an estimator can actually price against takes a couple more steps.
Exporting: Go to File → Export → Reports → Schedule, and export as a tab-delimited .txt file, which opens cleanly in Excel with columns mapping properly. Copy-paste works too for a quick check, but it loses formatting and isn't great for a formal deliverable.
Formatting for BOQ use: Once it's in Excel, you'll typically need to add waste/wastage factors, since Revit's raw quantities are the theoretical model quantities, not the actual order quantities. A floor tile schedule that shows exact room area still needs roughly 10% added for cutting waste, more for diagonal layouts. Skip this step and someone's ordering short mid-project, which is a genuinely bad way to spend a Tuesday.
Naming and structure: Estimators expect a BOQ to be organized by trade or work section, with clear units, descriptions, and quantities lined up. A raw Revit export dumped straight into a spreadsheet rarely matches that format out of the box, budget time to restructure it, or build a template that maps Revit's export columns directly into your firm's standard BOQ layout so this step isn't reinvented every project.
Worth flagging clearly: this on-page process covers taking quantities to a BOQ. Full 5D BIM, where cost data lives natively linked to the model rather than exported out, is a deeper workflow that deserves its own dedicated guide rather than being squeezed in here.
Common Errors That Skew Takeoff Accuracy
A handful of mistakes show up constantly, even among people who know Revit reasonably well.
Double-counting linked elements: When you're working across linked models (architectural linked into a structural file, say), it's easy to accidentally schedule the same element twice, once from the host model, once from the link. Always check whether your schedule is set to include linked model elements deliberately, not by accident.
Ignoring phasing filters: If your model has demolition, existing, and new construction phases, and your schedule isn't filtered correctly, you can end up quantifying elements that aren't even part of the current scope. This one's sneaky because the numbers look plausible until someone checks them against the drawings.
Unit setting mismatches: Mixing up square meters and linear meters, or forgetting a volume field is reporting in cubic feet when your project standard is cubic meters, throws every downstream number off. Always double-check project units before finalizing a takeoff, not after.
Inconsistent material naming: Already mentioned above, but worth repeating because it's genuinely the most common issue. Standardize before modeling, not after.
Also Read: BIM Engineer Interview Questions and Answers 2026
Curious how quantity takeoff skills translate into real BIM job roles? Kaarwan's Revit and BIM Certification programs cover this alongside coordination and documentation skills firms are actively hiring for.
Conclusion
Quantity takeoff in Revit isn't really about learning a few menu clicks, it's about trusting that the model itself holds the truth, and knowing how to ask it the right questions. Once that shift clicks, schedules stop feeling like a chore and start feeling like the fastest way to answer "how much concrete is actually in this building" without touching a scale ruler.
Ready to build these skills on real projects? Explore Kaarwan's BIM Certification programs and start working the way modern BIM teams actually operate.
FAQs
Is Revit takeoff accurate enough for tendering?
Yes, when the model is properly built with correct material assignments and no placeholder geometry. Model-based takeoff is generally far more accurate than manual 2D measurement, though it's still standard practice to have a second person review the schedule before it feeds into a formal bid.
How does this relate to 5D BIM?
Quantity takeoff is essentially the foundation 5D BIM builds on. Where a basic Revit takeoff exports quantities out to Excel for pricing, full 5D BIM keeps cost data linked live to the model, so cost updates automatically as design changes happen, no re-export needed. It's a more advanced, separate workflow built on the same underlying skill.
Do estimators need to know Revit?
Not necessarily to an advanced modeling level, but enough to open a model, navigate it, filter and read schedules, and understand what level of detail a model actually contains is increasingly expected. Estimators who can do this comfortably tend to move into better-paying, more senior cost roles faster than ones who only work from 2D drawings.