You have spent a day building a complex parametric facade in Grasshopper. The geometry is exactly right , adaptive panels responding to solar angles, the curvature working perfectly. And then you open Revit.
And you rebuild it from scratch.
Every wall. Every element. One by one. Because Rhino and Revit do not talk to each other. The .3dm file that comes in is dead geometry , no intelligence, no parameters, nothing Revit can actually use for documentation. That rework kills hours on every complex project. Sometimes days.
Rhino Inside Revit was built to eliminate this entirely. This guide covers what it actually is, how to install it with version-specific details that actually matter, the real workflow benefits, and whether it is worth adding to your skillset in 2026.
New to Rhino and Grasshopper? Start here first: Rhino and Grasshopper 101: Essential Skills for Beginners
What Is Rhino Inside Revit?
Rhino Inside Revit , officially called Rhino.Inside.Revit or RiR , is a technology developed by Robert McNeel and Associates (the makers of Rhino) that embeds Rhino and Grasshopper directly into Autodesk Revit's memory. Not alongside it. Not linked to it. Inside it , the same way any other Revit add-on loads.
The critical thing to understand, and what most explanations gloss over: RiR is not a file import or export bridge. It is a live, bidirectional integration operating at the API level. When you create geometry or run a Grasshopper script inside RiR, the output becomes native Revit elements , actual walls, floors, curtain panels, structural framing with properties, schedules, and documentation capability. Not a dead mesh import. Not a linked file. Real Revit elements.
Compare that to the traditional workflow , export from Rhino as .SAT or .DWG, import into Revit, fix broken faces, rebuild parameters, lose the parametric logic entirely, repeat every time the design changes. RiR removes that cycle completely. A change to a Grasshopper slider updates the Revit model in real time.
That distinction , live bidirectional bridge versus one-time file transfer , is what makes this technology genuinely useful rather than just another interoperability tool.
Want to combine computational design with BIM workflows? Explore Kaarwan's Revit and BIM Certification and build industry-ready project skills.
How to Install Rhino Inside Revit , Step by Step
For the installation guide, refer to how to install Revit plugins as a baseline: How to Install Revit Plugins , Step by Step.
RiR-specific installation has a few details that trip people up. Here is the version-specific breakdown for 2026.
Prerequisites Before You Install
Get these right before downloading anything. Mismatched versions are the most common reason RiR fails to load.
- Rhino 7 or Rhino 8 required. Rhino 8 is recommended for 2026 , it supports the latest RiR features and has better stability with newer Revit versions.
- Revit 2020 or later recommended. RiR technically supports Revit 2018 through Revit 2027, but 2018 and 2019 have limited support for newer components. For smooth use, Revit 2020+ is the practical minimum.
- Windows only. RiR does not support macOS. Both Rhino and Revit must be running on Windows.
- Admin rights on the machine. The installer requires administrator permissions.
- Minimum 16GB RAM. You are running two heavy applications in the same memory space. 16GB is the floor; 32GB is comfortable for real projects.
Step 1 : Download Rhino Inside Revit
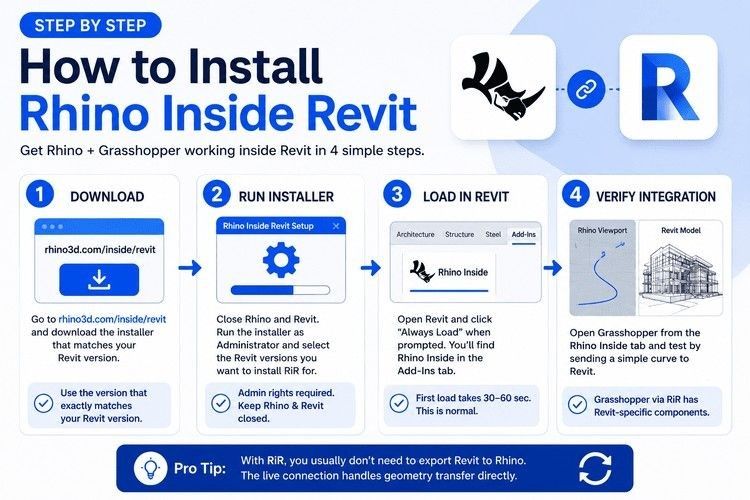
Go to rhino3d.com/inside/revit , this is the official McNeel page. Download the latest installer for your specific Revit version.
If the main site is slow, Food4Rhino is the alternative download source. Either is fine , both host the official installer.
Match the RiR installer version to your Revit version. If you have multiple Revit versions installed, there are separate installers for each , download accordingly.
Step 2 : Run the Installer
Close Rhino and Revit completely before running the installer. Not minimised , fully closed.
Run the installer as administrator. It auto-detects your existing Rhino and Revit installations. If you have multiple Revit versions installed, the installer will ask which ones to link to RiR , select all that you want to use.
Step 3 : Load RiR in Revit
Open Revit normally. On first launch after installing RiR, Revit will show a prompt asking you to confirm loading the add-in. Select Always Load , this skips the confirmation dialog on every future session.
Navigate to the Add-Ins tab in the Revit ribbon. You will see a new Rhino Inside panel. The first load takes 30 to 60 seconds as Rhino loads into Revit's memory , this is normal. Subsequent loads are faster once cached.
Step 4 : Verify the Integration
Once loaded, a Rhino viewport becomes accessible inside Revit, and the Grasshopper editor opens from the same RiR panel. To confirm the integration is working: create a simple curve in Rhino, use the Add Model Curve component in Grasshopper to push it into Revit as a model line. If it appears in Revit's model, everything is connected correctly.
Open Grasshopper through the RiR panel , not through a standalone Rhino session. When you open Grasshopper through RiR, you will see additional tabs that do not appear in a regular Grasshopper window: Revit-specific components for querying, modifying, and creating Revit elements. These only appear when Grasshopper is running inside RiR.
Common Installation Issues
This is the section that does not exist anywhere else and will save you an hour of troubleshooting.
RiR tab not showing in Revit after installation: Check that add-ins are not blocked by your IT admin policy. In corporate office setups in India, this happens more often than you'd expect. Revit's options panel under Add-Ins → External Tools shows what is loaded and what is blocked.
Incompatible version error on launch: This usually means the RiR installer version does not match the Revit version exactly. Download the version-specific installer from the McNeel site rather than using a generic download.
Slow first load: Normal. Rhino loading into Revit's memory for the first time takes longer. Subsequent sessions load much faster. If it is slow every time , check available RAM. Below 16GB causes consistent slowness.
Grasshopper opens without Revit components visible: You opened Grasshopper from a standalone Rhino session, not from the RiR panel inside Revit. Close it and open Grasshopper through the Rhino Inside tab in Revit.
How to Export Revit to Rhino
Worth covering briefly because people ask , though with RiR installed, direct export is often unnecessary.
Revit does not natively export to Rhino's .3dm format. Traditional export paths are DWG, SAT, or IFC , all importable into Rhino. The process: clean up the Revit model first (remove elements you do not need, verify unit consistency), export via File → Export, then import into Rhino with matching unit settings, and verify scale and orientation after import.
The practical note: with RiR, you often do not need to export at all. The whole point of the live integration is that geometry transfers between environments without file exchange. If you find yourself exporting Revit to Rhino frequently after installing RiR, you are probably not fully using the integration , the bidirectional link handles most geometry transfer use cases directly.
Top 7 Benefits of Using Rhino Inside Revit
1. Complex Geometry in BIM Without Rebuilding
This is the core benefit, and if you have ever manually rebuilt a parametric facade in Revit after designing it in Rhino, you know exactly why it matters.
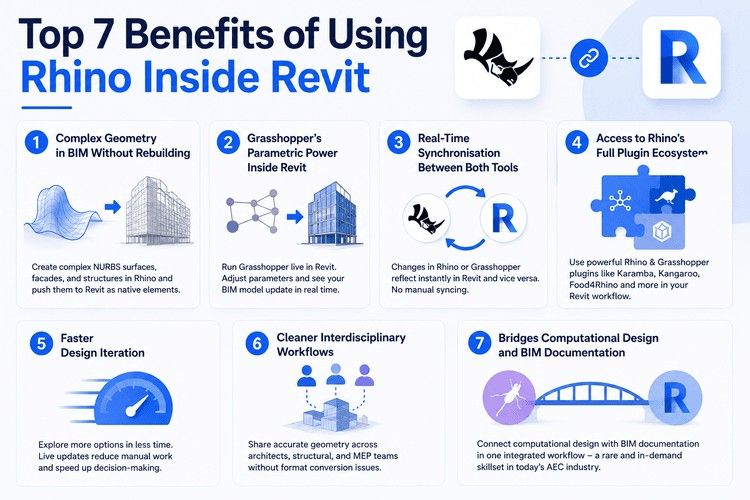
Freeform surfaces, organic structures, complex panelisation systems, NURBS-based envelopes , things that Revit's native modelling tools simply cannot create , can be built in Rhino and pushed directly into the Revit BIM model as native elements. Not as reference geometry. Not as a linked mesh. As actual Revit walls, curtain panels, floors.
For architects in India working on commercial high-rises, hospitality projects, or any facade with complexity beyond flat planes, this saves days of rework per project. The design iteration cycle that used to involve manual rebuilding after every design change collapses entirely.
2. Grasshopper's Parametric Power Inside Revit
Grasshopper scripts run live inside Revit via RiR. Parametric logic , adaptive facades, structural grid systems, panelisation scripts, curtain wall patterns , drives Revit model elements directly. Adjust a Grasshopper slider and watch the Revit model update in real time.
This is parametric design in Revit in the truest sense. Not Revit's own parametric families, which have real limitations with complex geometry , but Grasshopper's full algorithmic capability applied directly to BIM elements.
Also Read: Parametric Architecture with Rhino and Grasshopper
3. Real-Time Synchronisation Between Both Tools
Changes in Rhino or Grasshopper reflect immediately in Revit. This works bidirectionally , Revit data like levels, grids, and structural axes can be pulled into Grasshopper for use in parametric logic. The model stays consistent across both environments without any manual syncing.
For a practice working across early schematic design in Rhino and BIM documentation in Revit simultaneously , which is how most serious design firms actually work , this means the two phases are no longer disconnected. Changes cascade automatically.
4. Access to Rhino's Full Plugin Ecosystem
With RiR, Rhino's entire plugin library becomes accessible inside the Revit workflow. Structural analysis plugins like Karamba, fabrication tools, custom Grasshopper components from Food4Rhino, rendering integrations, form-finding tools like Kangaroo , all of these can feed directly into the BIM documentation process.
Also read: Top 10 Must-Know Plugins for Rhino and Grasshopper
5. Faster Design Iteration
Because Grasshopper changes propagate live into Revit, the time cost of design exploration compresses significantly. Testing five facade variations without RiR , each one requiring manual modelling in Revit , might consume a full day. With RiR and Grasshopper, the same exploration happens in a few hours.
For commercial projects under deadline pressure in India, this is a direct business benefit. Firms doing hospitality, institutional, or complex residential work where the client expects design options quickly , RiR is what makes that realistic without destroying the team.
Also Read: Workflow Automation in Rhino and Grasshopper
6. Cleaner Interdisciplinary Workflows
Structural engineers using Rhino for analysis models, MEP consultants, and architects using Revit for documentation can share geometry through RiR without format translation friction. The geometry that the structural engineer is working with in Rhino can become the same geometry the architect is documenting in Revit, without a conversion step that introduces errors.
For large commercial or infrastructure projects in India where multiple consultants work simultaneously, this reduction in file-format translation reduces both errors and the time spent on coordination.
7. Bridges Computational Design and BIM Documentation
This is the most strategically important benefit for career-focused learners , and it is the one that most pages covering RiR never fully explain.
Computational design skills (Rhino, Grasshopper, parametric thinking) and BIM documentation skills (Revit, coordination, construction documentation) have historically been separate career tracks. Professionals tend to be strong in one and weak in the other. RiR makes them a single integrated workflow.
Professionals who can do both , design complex parametric geometry AND produce coordinated BIM documentation from the same model , occupy a rare skillset bracket. International AEC firms, large infrastructure consultancies in India, and studios doing design-build work all need exactly this. Job listings for senior BIM and computational design roles increasingly mention both Grasshopper and Revit in the same requirement.
The rhino revit integration skillset is not common. Most professionals learned Revit and Rhino separately and never connected them. RiR is the bridge , and the people who know how to use it are currently ahead of the market.
RiR vs Other Revit Integrations , Which One Should You Use?
| Rhino Inside Revit | Grasshopper in Revit (via RiR) | GHPython in Revit | Dynamo | |
| Best for | Complex 3D geometry + BIM | Parametric design driving BIM | Custom scripting + automation | Automation without Rhino |
| Requires Rhino | Yes | Yes (runs via RiR) | Yes (runs via RiR) | No |
| Learning curve | Medium | Medium | High (needs Python) | Low–Medium |
| Ideal user | Architect with Rhino background | Parametric designer | Developer/advanced user | Revit-only BIM professional |
Dynamo is the one most comparison guides miss. It is worth including because it is the most common question: should I learn Dynamo or RiR?
If you already know Rhino and Grasshopper , RiR is the obvious answer. You are using skills you already have and gaining BIM output capability. The learning curve for RiR is manageable for anyone already working in Grasshopper.
If you have no Rhino background and just want Revit automation without learning a new modelling tool, Dynamo is more accessible as a starting point. But RiR has a higher design capability ceiling , and for architects doing anything geometrically complex, Dynamo simply cannot do what Grasshopper does.
Also Read: BIM for Architects: Benefits, Tools and Why It's Non-Negotiable in 2026
Is Rhino Inside Revit Worth Learning in 2026?
For Indian architects and engineers specifically, yes, and the case is getting stronger.
Firms in India working on hospitality, institutional, and parametric commercial projects increasingly require RiR as a practical workflow tool, not just a specialist capability. International AEC firms outsourcing design and documentation to Indian studios expect Revit documentation with Rhino-level geometry complexity , RiR is what bridges that expectation.
Job listings for senior BIM roles at AECOM India, WSP, Jacobs, and large Indian consultancies are starting to mention computational design tools alongside Revit. That shift has started. The professionals who get there first are the ones who benefit most.
For students: learning RiR while learning Revit puts you in a rare bracket , most professionals in the industry learned both tools separately and never figured out how to connect them. That gap is your advantage.
Want to master Revit workflows, including computational design integration? Explore Kaarwan's Revit and BIM Certification.
Frequently Asked Questions
Q1: What is Rhino Inside Revit used for?
RiR bridges Rhino's freeform geometry and Grasshopper's parametric tools with Revit's BIM documentation environment. It is used by architects and engineers who need complex geometry , organic facades, parametric structures, curved forms , to become native, documentable Revit elements without manual rebuilding.
Q2: Is Rhino Inside Revit free?
RiR itself is a free add-in from McNeel. However, it requires a licensed copy of both Rhino (approximately $1,000 one-time for a commercial licence) and Autodesk Revit (subscription-based). Students can access discounted educational licences for both , Rhino's 90-day evaluation is fully functional with no feature restrictions.
Q3: Does Rhino Inside Revit work on Mac?
No. RiR is Windows-only. Both Rhino and Revit must be running on Windows for the integration to work. This is a hard constraint , there is no macOS version of Revit, and RiR requires both applications.
Q4: What version of Revit does Rhino Inside Revit support?
Revit 2018 through 2027 is currently supported. Revit 2020 or later is recommended for best stability and access to all RiR features. Older versions (2018/2019) work but have limited support for newer components.
Q5: Should I learn Dynamo or Rhino Inside Revit?
Background determines the answer. If you know Rhino and Grasshopper, RiR is the direct choice , you apply existing skills and gain BIM output. If you are a Revit-only user looking for automation without learning a new modelling tool, Dynamo is more accessible as a starting point. For architects doing parametric or computational design work, RiR has significantly more design capability than Dynamo.