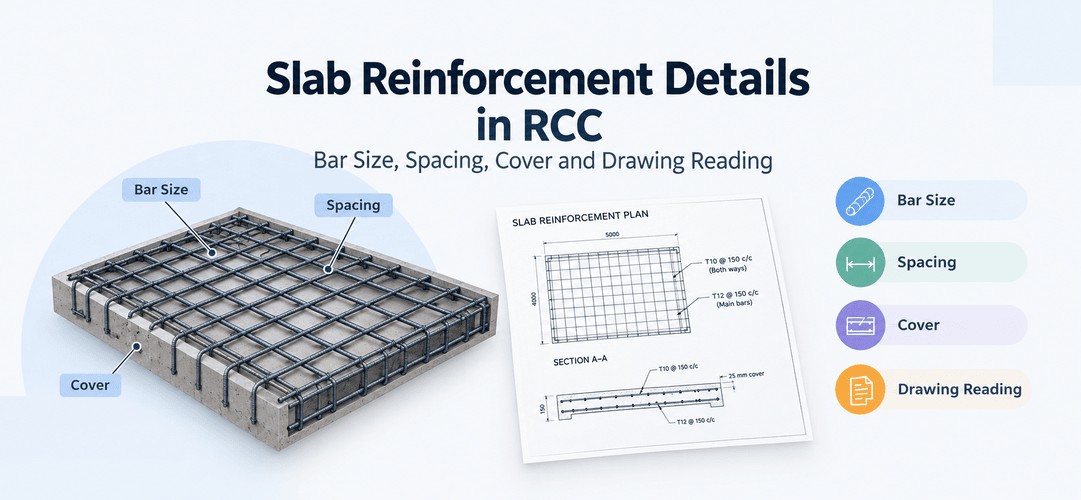
Slab reinforcement details tell your site team which bars go where in an RCC slab: main bars across the short span, distribution bars across them, extra steel over supports, plus the bar size, spacing and cover for each. The numbers come from the structural drawing and get checked against IS 456:2000. That is still the code in force in 2026, though a fifth revision is in draft. This guide covers each rule, shows you how to read a slab drawing line by line, and ends with the mistakes that keep turning up on Indian sites. If you want the basics first, our one-way and two-way slab design basics guide is the place to start.
Why sweat the details? BigMint's June 2025 outlook put construction at about 31% of India's steel demand (47 million tonnes) and infrastructure at another 28%. A lot of that steel ends up inside slabs, and it only does its job if it sits where the drawing says.
What are slab reinforcement details?
Picture a reinforced concrete slab as a plate that wants to sag in the middle. Concrete handles the squeezing on top. Steel handles the stretching underneath. Slab reinforcement details are the instructions for that steel: which diameter, how far apart, in which direction, at what height above the formwork, and where extra bars show up.
Miss one and the slab still gets cast. It just doesn't behave the way the designer assumed. Soffit cracks and a bouncy floor are usually how people find out.
Main bars and distribution bars: where each goes
Main bars do the heavy lifting. In a one-way slab they run along the short span, at the bottom. In a two-way slab you get main bars both ways, and the short-span set sits lower, closest to the formwork, because it carries more load.
Distribution bars run across the main bars. They hold the mesh together and control shrinkage and temperature cracks.
Here's a quick site check. In a one-way slab, the bars touching the shuttering should run along the short span. If they run along the long span, somebody has swapped the layers. The full logic is in our one-way and two-way slab design basics guide, so I won't repeat it here.
Reading slab drawings is step one. Kaarwan's Professional BIM Certification Program for Civil Engineers teaches you to model RCC slabs and rebar in Revit.
Minimum reinforcement in a slab as per IS 456
IS 456 sets a floor on steel so a slab never leans on concrete alone to resist cracking. Clause 26.5.2.1 asks for at least 0.12% of the gross cross-sectional area in each direction for high-strength deformed bars (Fe 415, Fe 500), and 0.15% for mild steel. Most Indian sites now buy Fe 500 or Fe 500D TMT bars (IS 1786), so 0.12% is the number you'll meet.
Take a 125 mm slab. Minimum steel is 0.12/100 × 1,000 × 125 = 150 mm² per metre width. Eight mm bars at 300 mm c/c give about 168 mm² per metre, so they clear the floor. Real slabs need far more for bending, because the minimum is a floor, not a design.
Table 1. IS 456:2000 limits for slab reinforcement (d = effective depth, D = slab thickness)
| Item | Limit | Clause |
| Minimum steel, each direction | 0.12% of gross area (Fe 415/500); 0.15% (Fe 250) | 26.5.2.1 |
| Maximum bar diameter | D/8 | 26.5.2.2 |
| Maximum spacing, main bars | Lesser of 3d or 300 mm | 26.3.3(b) |
| Maximum spacing, distribution bars | Lesser of 5d or 450 mm | 26.3.3(b) |
| Minimum clear spacing | Greater of bar diameter or max aggregate size + 5 mm | 26.3.2 |
| Nominal cover, mild exposure | 20 mm (15 mm if bars are 12 mm or less) | 26.4.2.1, Table 16 |
| Nominal cover, moderate / severe / very severe / extreme | 30 / 45 / 50 / 75 mm | Table 16 |
| Minimum bar diameter | No code value; practice is 8 mm for main bars | Practice |
Bar diameter and spacing limits
Minimum dia of bar in slab
This is the one people search for and rarely get a straight answer on. IS 456 gives no minimum bar diameter for slabs. It's practice. Most designers don't go below 8 mm for main bars, and roof and balcony slabs often use 10 mm. Thin bars flatten under foot traffic and sag between chairs. Distribution steel is usually 6 to 8 mm, though with the 0.12% rule you'll often see 8 mm there too. Whatever your drawing says is what goes in.
Maximum dia of bar in slab
The cap is one-eighth of the slab thickness. A 125 mm slab allows 15.6 mm, so 12 mm is the practical ceiling. A 150 mm slab allows 18.75 mm, so 16 mm. If someone proposes a 16 mm bar in a 120 mm slab (limit 15 mm), that's your red flag. Fat bars in thin slabs crowd the cover zone and bond badly.
Minimum spacing of bars in slab, and the maximum
Keep the clear gap between bars at no less than the bar diameter or the aggregate size plus 5 mm, whichever is greater. With 20 mm aggregate, that means 25 mm clear. On the top end, our 125 mm slab has d of about 101 mm (20 mm cover, 8 mm bar). That gives 3d = 303 mm, so the 300 mm cap rules for main bars. For distribution bars, 5d is 505 mm, so the 450 mm cap rules.
One more site trick. Bar weight per metre is diameter squared divided by 162. That gives 0.395 kg/m for 8 mm and 0.617 kg/m for 10 mm. Weigh a bundle against the delivery challan and you'll know quickly if the steel is short.
Top steel, bent-up (cranked) bars and extra bars over supports
In a continuous slab, the bending flips over the beam, so tension moves to the top. That's why you'll see extra top bars over supports, often reaching somewhere around 0.3 times the span into each side. The exact length is the detailer's call, so read it off the drawing.
Some detailers crank up alternate bottom bars near the support instead, so one bar does two jobs. Either way, top steel needs chairs. Without them it gets trampled to the bottom of the slab and does nothing. If crank bars or chairs are new terms, our RCC terminology guide has them.
Corner and torsion reinforcement in two-way slabs
Corners of a two-way slab try to curl up off their supports. Where a corner is discontinuous on both edges, IS 456 (Annex D, D-1.8) asks for torsion steel in four layers, top and bottom, parallel to both edges. Each layer carries 0.75 times the area of the maximum mid-span steel and extends one-fifth of the short span from the edge. Use half that where only one edge is discontinuous, and none where both edges are continuous.
For a 3.6 m short span, that's 720 mm of extra mesh at each affected corner. It's also one of the first things to go missing on site, because it looks like clutter.
Cover and chairs: keeping the steel in position
Table 16 gives 20 mm nominal cover for mild exposure, 30 mm for moderate, 45 mm for severe. Bars of 12 mm or less can drop 5 mm under mild exposure. Fire rating can push the number up as well.
Here's where Indian conditions matter. A terrace slab taking monsoon rain directly isn't "mild" under IS 456's exposure classes. Moderate is closer, and a coastal slab in Mumbai, Chennai or Kochi can land in severe. Always follow the structural notes on your drawing.
Use mortar or plastic cover blocks, not broken bricks and pebbles. Space the chairs closely enough that the top mesh doesn't sag when labour walks across it. Laying plank walkways helps more than people expect.
Openings, sunken slabs and cantilever slabs
Stair openings and shafts need trimming bars on every side. If a pipe or conduit is in the way, don't cut the steel. Ask the engineer to re-route or re-detail it.
Sunken slabs, popular for Indian bathrooms to hide plumbing, step the reinforcement down. Look carefully at the transitions at the edges.
Cantilever slabs flip the whole logic. The main steel goes on top and anchors back into the room slab. The classic failure is a balcony where the top bars got pushed to the bottom during pouring. Our cantilever balcony piece covers that in detail. The filler slab guide covers the lighter option for roofs.
Also read: Quantity takeoff using Revit
How to read a slab reinforcement drawing
Here's an illustrative slab, not from a live project. Slab S2 is a bedroom, 3.6 m × 4.2 m clear, 125 mm thick, M25 concrete, Fe 500D steel. The drawing carries three callouts: T8 @ 150 c/c (short span, bottom), T8 @ 175 c/c (long span, bottom), and T10 @ 150 c/c extra top over beam B3, 1,000 mm from the face.
- Find the panel and its size. S2 is 3.6 × 4.2 m. The ratio is 4.2 ÷ 3.6 = 1.17, below 2, so it's a two-way slab.
- Read the general notes first: concrete grade, steel grade, cover (20 mm here) and slab thickness.
- Decode the notation. T8 @ 150 c/c means 8 mm high-yield bars, 150 mm centre to centre. That gives 50.27 × 1,000 ÷ 150 ≈ 335 mm² per metre, comfortably above the 150 mm² floor.
- Check the layering. The short-span set sits nearest the formwork and the long-span set lies on top of it.
- Find the extra top bars. T10 @ 150 over B3 gives about 524 mm² per metre and extends 1,000 mm into the slab.
- Look at the corners for torsion steel. L/5 of the short span is 720 mm.
- Read the section for thickness, cover and chair spacing.
- Compare with the site before casting. Along the 4.2 m side, bars at 150 mm c/c means roughly 28 bars. Count them with a tape.
Want to go from reading rebar details to detailing them? Explore Structural Modelling (RCC) and Rebar, Steel and Fabrication modules in Kaarwan's civil BIM program.
Modelling slab rebar in Revit
Detailing in 2D takes you a long way. But when the same slab lives in a Revit model, the bar schedule, quantities and sleeve clashes come out of the model instead of a calculator. Revit handles slab steel through Area Reinforcement and individual Rebar elements, and those feed your bar bending schedule. To build this skill properly, the Professional BIM Certification Program for Civil Engineers covers Structural Modelling (RCC) in weeks 3 to 4 and Rebar, Steel and Fabrication in weeks 5 to 6. Our QTO in Revit walkthrough pairs well with it.
Common site mistakes (checklist)
- Cover blocks missing, so steel rests straight on the shuttering
- Top bars crushed down by labour walking on the mesh
- Short-span and long-span layers swapped
- Spacing stretched to save steel, say 200 c/c where the drawing says 150
- Bars cut for pipes or conduits without engineer approval
- Corner torsion steel left out
- A different diameter substituted without asking
- Laps bunched at mid-span instead of staggered
FAQs
What is the minimum diameter of bar in a slab?
IS 456:2000 gives no fixed minimum diameter for slabs. Practice is 8 mm for main bars (10 mm is common for roof and balcony slabs) and 6 to 8 mm for distribution bars. Follow your structural drawing.
What is the maximum diameter of bar in an RCC slab?
One-eighth of the slab thickness, per Clause 26.5.2.2. A 150 mm slab allows up to 18.75 mm, so in practice 16 mm.
What is double layer or double mesh reinforcement in a slab?
It means steel mesh at both the bottom and the top of the slab. Engineers specify it for thicker or heavily loaded slabs, for roofs where temperature cracking matters, and where negative moments occur over supports. Chairs hold the top mesh at the right height.
What is the minimum reinforcement in a slab as per IS 456?
At least 0.12% of the gross cross-sectional area in each direction for Fe 415 and Fe 500 bars, and 0.15% for mild steel (Clause 26.5.2.1).
What is the spacing of bars in a slab?
Main bars go no further apart than the lesser of 3d or 300 mm. Distribution bars go no further than the lesser of 5d or 450 mm. Clear gaps shouldn't fall below the bar diameter or the aggregate size plus 5 mm.
What is distribution steel?
Bars laid at right angles to the main bars. They hold the main steel in place, spread the load and control shrinkage and temperature cracks. The same 0.12% minimum applies.